6mm EVA Foam Black Leather Leather Rivets Barge TF Contact Cement Googly Eyes Wig and Overcoat Wood Dowels Feathers
Build Process
For the Sorsha build, I built the helmet and Tom built the sword. Josh and Kim (our featured cosplayer) took on pretty much all of the armor and embellishments.
My lone contribution to main Sorsha body armor, other than materials
There weren’t many in-process shots of the armor. Just a few blurry candids. Here is a cropped image from the corset belt Josh worked on. Black leather, rivets, and I’m pretty sure there’s some contact cement in there as well.
Here’s a shot of Kim when we were heading down to the main floor.Posing on the main floor at CVG2019Shot from the photo booth at CVG2019
Shoulder and Shin Armor – 6mm SKS Props HD-Foam and half round dowels
Shoulder Spikes & Fan Symbol on Upper Chest – Foam-Mo Foam Clay
Faux Rivets – Metal Sewing Buttons, Square Pyramid Rivets
3/4 Length Fleece Cape from Etsy
Leather Sword Gloves
Scrap Leather and Buckles
Barge TF Contact Cement
E6000
Aluminum Foil
Patterns Used:
Chest Base – Evil Ted’s Basic Male Body Armor Facemask – Kamui Cosplay’s Villian Mask (Modified) Helmet Base – Evil Ted’s Viking Helmet (Lower Half, Modified) Gauntlet – Freehand cut from 4mm TNT EVA Foam with scrap leather buckles. Shin Guards – Freehand cut from 6mm SKS HD Foam
Build Process
General Kael’s Chest Armor
Front Chest Plate – 6mm EVA-50 High Density Foam, TNT Cosplay Supply
Chest Armor – 6mm EVA-38 Foam, TNT Cosplay Supply
Back Armor – 10mm EVA-38 Foam, TNT Cosplay Supply
The chest armor base is another one of Evil Ted’s patterns (Male Body Armor), resized to my dimensions and modified to fit the cut-out of the armor in the movie. The back of the armor is 10mm Foam. The front and back are attached at the shoulders and the thickness were chosen so the armor would have a similar weight and feel in the front and back. If I remember correct, the Evil Ted pattern actually closes in the back.
Chest Armor, “Leather” Scales
The scales were cut from 4mm EVA Foam. I used one foam scale as a template and used scissors to cut them out. I sanded the edges lightly with finer grit sandpaper to give it an organic, worn look. The leather look was achieved by crumpling and flattening a piece of aluminum foil and pressing it lightly with a hot iron. I had to scale the size of each piece to match the number of rows and columns of the movie version. Each one was glue at about 1/3 of the base and overlapped with each row.
(Tom usually paints my stuff because I have a color deficiency issue along with red-green colorblindness. He wasn’t too thrilled about having to paint the scales after they were assembled. I tend to get overzealous with the build portion.)
The Chest Plate Border
I used half-round foam to create a border for the chest plate. I would’ve liked to use something thinner, in maybe a 1/4 round version but… Con Crunch was on at this point.
The Chest Isignia
I learned a couple of lessons working with vegetable tanned leather. This applies only to me though, so if you find a method that works for you, go for it. I have a friend that teaches leather tooling classes and I’m tempted to take a class or buy one of his guides.
You really only need a few tools to accomplish this kind of work. I got really overzealous and bought a large kit with too many things to store. The metal tools get really heavy in a single organizing case.
Get a leather scribe. Using a gel ink pen was a terrible idea. It’s especially bad if you’re planning to dye the leather when you’re finished. Luckily, might was painted with Angelus Acrylic Paints.
Don’t use too much water. It makes it too soft and hard to keep a print. Too little is also a problem as well, if it dries out before you can get a pattern to set. It also took a really long time to dry. Use a spray bottle.
It’s way harder to do that it looks. I did a pretty terrible job, but it’s a passable specimen for a first attempt. (Actually second. I messed up the first one.)
Painted Chest Insignia
Painted with Angelus Silver Acrylic Paint. I believe it also got a clear top coat after the armor was fully painted. The paint pretty much covered up the pen marks. Pretty ‘not terrible’ for free-handing and zero experience.
The Fan Emblem
This took a few tries, but I made the Fan Emblem (above the chest insignia) from Foam-Mo Foam Clay. I rolled out several small lines of foam and curled them. I cut them in half to get the mirroring right.
Shoulder Armor
The shoulder armor was built from a should armor pattern, but I can’t recall which one. I believe it was a generic template. The spikes were made by pressing the Foam-Mo Foam Clay into Pyramid shaped silicone molds I bought on Amazon. They took quite a while to dry. The base is made from SKS Props 6mm HD Foam. To be honest, not my favorite foam to use.
Tom finished up the assembly and got it ready for paint. He used hot glue to simulate the welding lines in the movie prop.
Gauntlet
The gauntlet is designed from a generic gauntlet pattern, with extra pieces added to make up the finger guard. I used half-round pearls from the craft store for the rivets. I didn’t want to deal with the sound of rattling googly eyes every time I moved.
This one is coated with DAP Kwik Seal thinned with water. We’ve been trying out different seal coating products for this purpose. Tom gave it the standard metal paint treatment.
Finished Gauntlet with Sword Glove and Helmet
The Final Shin-sult
Apparently, I didn’t take many photos of my shin armor. They’re in storage right now and a pain to get out, so this picture will have to suffice for the time being until I can update it. I know they’re sitting a little high. That’s why the rest of the picture is there to distract you.
EVA Foam – 4mm & 6mm, TNT Cosplay Supply Foam Clay – C4 Foam Clay, TNT Cosplay Supply Styrene Plastic Sheet – TNT Cosplay Supply Aluminum Chainmail Coif (Split into 2 pieces for Kael’s Helmet and Sorsha’s Chainmail Collar) Faux Fur – Part of my winter coat that I didn’t need. It was removable. Leather, Gun Metal Colored Rivets, Stainless Steel Screws
Patterns Used:
Chest Base – Evil Ted’s Basic Male Body Armor Facemask – Kamui Cosplay’s Villian Mask (Modified) Helmet Base – Evil Ted’s Viking Helmet (Lower Half, Modified) Gauntlet – Freehand cut from 4mm TNT EVA Foam with scrap leather buckles. Shin Guards – Freehand cut from 6mm SKS HD Foam
Build Process
The helmet was built as a combination of two templates. The funny part is that the 2 pieces I used for the base were just laying around from some practice builds. A little bit of trimming and adjustment and I was able to fit a pivot point for the mask to flip up. Hardware was later changed to stainless steel since I have a nickel allergy.
I had the bottom half of one of Evil Ted’s helmets, which I modified a little and attached a facemask to it after finding a suitable pivot point.
General Kael – Facemask Reference
I used auction photos, as well as other reference photos to sculpt the facemask. The base is Kamui’s Villain Mask with a foam block added at the bottom to fill out the jawline. My understanding is that the mask is a Troll skull, like the ones crawling all over the Castle at Tir Asleen.
General Kael – Facemask Sculpting with Foam Clay
It took several applications to sculpt the mask fully. I went a little thick and it took a while to dry. This part was really a lot of fun and easy to carried away on. In this case, the sculpt was a little less symmetrical but pretty close. I think this added to the organic look of the skull.
I used TNT’s C4 Foam Clay for this mask. The texture is softer and is more pliable. I think they use some sort of flexible PVA in the formulation. I really like it. Pixiss has a similar formula to TNT’s and is sold on Amazon, if that’s easier to get.
The density of the Foam Clay sold by Foam-Mo and SKS Props didn’t feel right for this kind of sculpt. The formulation of these two brands are very similar, if not the same. I used this foam to make the spikes for my shoulder armor. This foam can get brittle.
General Kael – The Troll Teeth
I can’t tell you how much fun it was to sculpt Troll teeth with the foam. I ended up making a generic upper and lower jawline before added the teeth. I rolled the teeth out individual and smoothed them into the upper and lower sections. It was fun making the broken and impacted teeth as well.
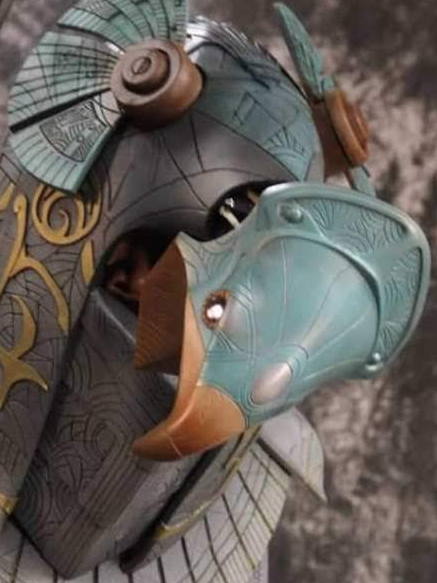
General Kael – The Helmet Fins
I had less than stellar results with the original fins. I used a thermoplastic sheet that had a lot of flex. I later changed this to a Styrene sheet, also from TNT Cosplay Supply. I curled it using can of some kind, if I remember correctly, and a heat gun.
Thermoplastics are not rigid…
General Kael – Helmet Features
The details were fun to put together. I think the leather strip along the center line could have turned out a little better. I used scrap brown leather for this part. After this, I added tassels of hair, made from a cheap, black wig and bead crimp loops.
The strip under the leather weave and along the bottom is 2mm EVA Foam, folded over on both sides of the lip of the helmet. There’s a section of clothes hanger wire inside to prevent the chainmail rings from tearing through.
General Kael – Helmet Features
This poorly smudged out photo (I’m definitely not a great graphics person), features the helmet flipped up. You can see that I’ve fully commited to the part, replicating Kael’s shaved moustache center and I let my beard and hair grow wild.
The Horus headpiece was Tom’s masterwork. The pepakura model was covered in several layers of paper mache, following by many, many… uh, many… coats of Bondo. The result was a beautiful piece of art. Unfortunately, the Bondo made it fairly heavy we had to come up with a mounting solution. We used a large cell phone mounting plate and seriously strong neodymium rare earth magnets. This will be outlined in the related electronics post.
Completed Horus HeadpiecePepakura BaseAfter paper mache and bondo filler
Helmet: EVA Foam, Foam Clay, Styrene, Leather Chest Armor: EVA Foam, Leather, Buckles Cape: Fleece Sword: EVA Foam with a 3/8″ Metal Core, Leather
General Kael’s Helmet & Facemask
EVA Foam – 4mm & 6mm, TNT Cosplay Supply Foam Clay – C4 Foam Clay, TNT Cosplay Supply Styrene Plastic Sheet – TNT Cosplay Supply Aluminum Chainmail Coif – Split for Kael’s Helmet and Sorsha’s Collar Faux Fur – Part of my winter coat that I didn’t need. It was removable. Leather, Gun Metal Colored Rivets, Stainless Steel Screws
The helmet was built as a combination of two templates. The facemask I had already built with no purpose in mind. A little bit of trimming and adjustment and I was able to fit a pivot point for the mask to flip. Hardware was later changed to stainess steel since I have a metal allergy.
I used auction photos, as well as other reference photos to sculpt the facemask. The base is Kamui’s Villain Mask with a foam block added at the bottom to fill out the jawline. My understanding is that the mask is a Troll skull, like the ones crawling all over the Castle at Tir Asleen.
General Kael – Facemask Sculpting with Foam Clay
It took several applications to sculpt the mask fully. I went a little thick and it took a while to dry. This part was really a lot of fun and easy to carried away on. In this case, the sculpt was a little less symmetrical but pretty close. I think this added to the organic look of the skull.
I used TNT’s C4 Foam Clay for this mask. The texture is softer and is more pliable. I think they use some sort of flexible PVA in the formulation. I really like it. Pixiss has a similar formula to TNT’s and is sold on Amazon, if that’s easier to get.
The density of the Foam Clay sold by Foam-Mo and SKS Props didn’t feel right for this kind of sculpt. The formulation of these two brands are very similar, if not the same. I used this foam to make the spikes for my shoulder armor. This foam can get brittle.
General Kael – The Troll Teeth
I can’t tell you how much fun it was to sculpt Troll teeth with the foam. I ended up making a generic upper and lower jawline before added the teeth. I rolled the teeth out individual and smoothed them into the upper and lower sections. It was fun making the broken and impacted teeth as well.
I had less than stellar results with the original fins. I used a thermoplastic sheet that had a lot of flex.
I later changed this to a Styrene sheet, also from TNT Cosplay Supply. I curled it using can of some kind, if I remember correctly, and a heat gun.
General Kael – Helmet Features
The details were fun to put together. I think the leather strip along the center line could have turned out a little better. I used scrap brown leather for this part. After this, I added tassels of hair, made from a cheap, black wig and bead crimp loops.
The strip under the leather weave and along the bottom is 2mm EVA Foam, folded over on both sides of the lip of the helmet. There’s a section of clothes hanger wire inside to prevent the chainmail rings from tearing through.
General Kael – Helmet Features
This poorly smudged out photo (I’m definitely not a great graphics person), features the helmet flipped up. You can see that I’ve fully commited to the part, replicating Kael’s shaved moustache center and I let my beard and hair grow wild.
General Kael’s Armor
Front Chest Plate – 6mm EVA-50 High Density Foam, TNT Cosplay Supply Chest Armor – 6mm EVA-38 Foam, TNT Cosplay Supply Back Armor – 10mm EVA-38 Foam, TNT Cosplay Supply Chest Armor Scales – 4mm EVA-38, TNT Cosplay Supply Shoulder Spikes & Fan Symbol on Upper Chest – Foam-Mo Foam Clay Faux Rivets – Metal Sewing Buttons, Square Pyramid Rivets 3/4 Length Fleece Cape from Etsy Leather Sword Gloves Scrap Leather and Buckles
Chest Armor, In-Progress
The chest armor base is another one of Evil Ted’s patterns, resized to my dimensions and modified to fit the cut-out of the armor in the movie. The back of the armor is 10mm Foam so the armor would have a similar weight and feel in the front and back.
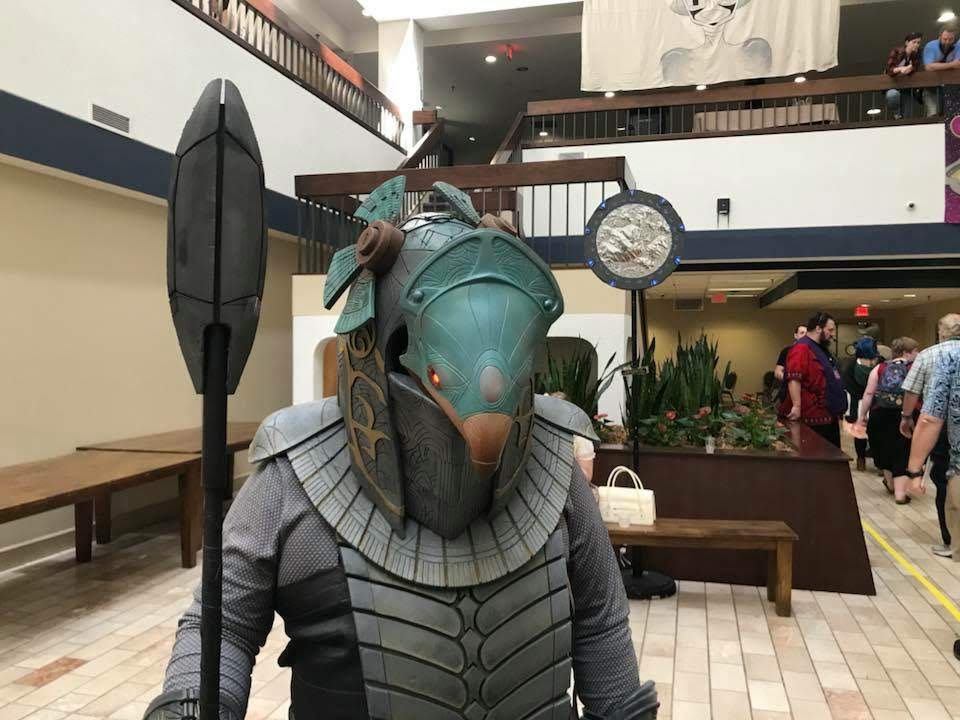
General Kael’s armor in the movie is leather with metal shoulders, shin guards, and a gauntlet cover on his sword hand.
Base – Evil Ted’s Basic Male Body Armor Facemask – Kamui Cosplay’s Villian Mask (with adjustments descrbe below) Gauntlet – Freehand cut from 4mm TNT EVA Foam with scrap leater buckles. Shin Guards – Freehand cut from 6mm SKS HD Foam
Chest Armor, “Leather” Scales
The scales were cut from 4mm EVA Foam. I used one foam scale as a template and used scissors to cut them out. I sanded the edges lightly with finer grit sandpaper to give it an organic, worn look. The leather look was achieved by crumpling and flattening a piece of aluminum foil and pressing it lightly with a hot iron.
I had to scale the size of each piece to match the number of rows and colums of the movie version. Each one was glue at about 1/3 of the base and overlapped with each row.
Tom usually paints my stuff because I have a color deficiency issue along with red-green colorblindness. He wasn’t too thrilled about having to paint the scales after they were assembled. I tend to get overzealous with the build portion.
The Chest Plate Border
I used half-round foam to create a border for the chest plate. I would’ve liked to use something thinner, in maybe a 1/4 round version but… Con Crunch was on at this point.
The Chest Isignia
I learned a couple of lessons working with vegetable tanned leather. This applies only to me though, so if you find a method that works for you, go for it. I have a friend that teaches leather tooling classes and I’m tempted to take a class or buy one of his guides.
1. You really only need a few tools to accomplish this kind of work. I got really overzealous and bought a large kit with too many things to store. The metal tools get really heavy in a single organizing case.
2. Get a leather scribe. Using a gel ink pen was a terrible idea. It’s especially bad if you’re planning to dye the leather when you’re finished. Luckily, might was painted with Angelus Acrylic Paints.
3. Don’t use too much water. It makes it too soft and hard to keep a print. Too little is also a problem as well, if it dries out before you can get a pattern to set. It also took a really long time to dry. Use a spray bottle.
4. It’s way harder to do that it looks. I did a pretty terrible job, but it’s a passable specimen for a first attempt. (Actually second. I messed up the first one.)
Painted Chest Insignia
Painted with Angelus Acylic Paint. I believe it also got a clear top coat after the armor was fully painted.
The Fan Emblem
This took a few tries, but I made the Fan Emblem (above the chest insignia) from Foam-Mo Foam Clay. I rolled out several small lines of foam and curled them. I cut them in half to get the mirroring right.
Shoulder Armor
The shoulder armor was built from a should armor pattern, but I can’t recall which one. I believe it was a generic template. The spikes were made by pressing the Foam-Mo Foam Clay into Pyramid shaped silicone molds. I bought a set on Amazon. They took quite a while to dry. The base is made from SKS Props 6mm HD Foam. To be honest, not my favorite foam to use.
Tom finished up the assembly and got it ready for paint. He used hot glue to simulate the welding lines in the movie prop.
Gauntlet
The gauntlet is designed from a generic gauntlet pattern, with extra pieces added to make up the finger guard. I used half-round pearls from the craft store for the rivets. I didn’t want to deal with the sound of rattling googly eyes every time I moved.
This one is coated with DAP Kwik Seal thinned with water. We’ve been trying out different seal coating products for this purpose. Tom gave it the standard metal paint treatment.
The Final Shin-sult
Apparently, I didn’t take many photos of my shin armor. They’re in storage right now and a pain to get out, so this picture will have to suffice for the time being until I can update it. I know they’re sitting a little high. That’s why the rest of the picture is there to distract you.
The blade is made from two long strips of 6mm EVA Foam (TNT). The core of the sword is a 3/8″ steel rod. In retrospect, it would have been smarter to put in two rods and leave the center open because of the fuller. If you look at it up close, you can see the rod through the foam since the fuller is on both sides. We could’ve also just shaded it a different color, but I think at that point it was too late for that.
This is the same method used for Sorsha’s sword as well.
The Scalloped Edge
The design of the scalloping in the edge of the sword is actually offset like it is in the movie prop.
The Scalloped Edge – Transformed
You can see the scalloping on the edge looks really good here. Tom, was the main builder for both swords and had the patience to grind out each groove in the scallop with a rotary tool. I made the guard and rings and Tom made everything else.
The Fuller
Grinding in the fuller was a two-person undertaking, because of the types of tools we had at our disposal. Tom’s drill press needed some maintenance and was out of commission for this. I bought a plunge jig for a drill and after some careful measuring, we locked the plunge depth and ground out the fuller with a round sanding bit purchased at Ax-Man Surplus. This is when we discovered the metal rod was a problem.
The Finished Hilt
The finished hilt.
Scabbards / Holders
I bought 2 frogs for the swords. I kept the scabbard simple since I wanted the sword to be visible, even when it was in the holder.
Chainmail
I wasn’t sure if I could get a quality hauberk in my size that would stay together properly during extended wear, so I settled for a fabric version that was passable at a distance. This is the close-up pattern of the weave.
Crown Materials: Worbla Finest Art, EVA Foam, Steel D-Rings, Nylon Webbing, Black Linen Robe Materials: Linen Cloth
Build Process
Building Bavmorda’s Crown
This was my first time using Worbla. It’s incredibly expense to buy in the US, so it’s hard to justify the spend. However, I have a few sample packs I purchased of the different versions of the thermoplastic — as well as some other brands. I ended up using the sandwich method, with a layer of 2mm foam in the middle. It worked out well, but Worbla’s Finest Art is a bit grainy and textured. I worked in sections.
The Sculpted Bavmorda’s Crown
At this point, the details were pretty much finished. The points were also sandwiched Worbla and 2mm EVA Foam, and then twisted into shape and then mirrored on the opposite fin.
I originally planned to make the crown adjustable, but in the end I added D-rings to the front (behind the center piece) and to the center of the back where these 2 strips meet. I installed an nylon strap with a cam buckle so it could be adjusted to rest comfortably on the head without falling down. I tried to smooth out the gaps the best I could and then the whole thing got coated in layers of gesso. I also embedded in some metal wire loops inside to attach the fabric to (I can’t recall what kind of metal it was).
Painting Bavmorda’s Crown
It started with a layer of black primer and then finished with acrylic paint and a clear coat.
Bavmorda’s Crown, Completed.
Post-assembly photo. I doubled over a black linen scarf and hand sewed it into the 3 anchor points inside the crown. I believe I also stitched it (at least the bottom layer of linen) to the nylon webbing to keep it in place.
After discovering the plans by Honus for an Animatronic Stargate Helmet last summer, I became obsessed with making my own Jaffa uniform. The helmet was by far the trickiest part of the build. Funny thing is, it’s the first thing I started and the last to get finished. We were even fixing it on the way down to the Hall Contest Table at CONvergence. There’s a fair amount of detail required. FYI, the electronics will be covered in its own post. I need to gather up the resources Tom used for the electronics.
This took a lot of rework. A lot of it was because I hadn’t worked on this type of project before and, frankly, it was pretty ambitious for a first project. Misery comes in three: I ended up having to make most of the parts 3 times. The base of the helmet was built twice in Pepakura and a third and final time in 8MM EVA Foam from TNT Cosplay Supply. This took most of the roll to complete. I was still new to Pepakura and it took a lot of manipulating to get the printouts to complete the template. I also made 2 Horus and 2 Anubis Guard headpieces out of paper from the Pepakura files, which I ended up destroying with expanding foam. I learned a lot of lessons that day. That was also how I destroyed the first Pepakura helmet. The second Pepakura helmet didn’t fare much better and became deformed because of the spray foam (the correct one this time) and the hard safety hat I had glued in. The EVA Foam helmet was a much better fit.
I should also point out that some of the carved designs are not screen accurate. Frankly, I fudged a lot of it. I didn’t have enough reference photos to work off of, so I replicated the larger artifacts and freehanded the rest of the pattern carving. At the time, there was a huge time crunch looming with CVG2018 approaching.
Build Images
Here’s a happy shot of me while we decided where to trim the foam extensions.Trimmed and fitted with the face covering. The cover is reinforced with aluminum bars to hold its shape. Without an eye screen, it actually makes a fairly sturdy handle for carrying.Initial carving, before hitting it with the heat gun to expand the gaps.Closer carving designs and feature detail. The unwanted gaps were filled with Kwik Seal. The lines were cut lightly, then hit with a heat gun to open the lines.Slightly out of focus rear carving, free-handed with EVA foam.The grey foam I used to make the accent pieces ended up being a lower density EVA foam so it shredded a little when sanding.EVA Foam detail from the top of the helmet.One more shot of detail on the tailpiece of the helmet. I’m particularly proud of the scarab at the bottom.Small detailed shot of the ear fan. There will be more detail in electronics post.Helmet after painting. This may have been an earlier iteration of the paint. Tom is my paint guy and went through a few versions until he was happy with the color.I used sketches like these to cut out the shapes needed. I cut out the pattern and transferred it to 2MM EVA Foam. The ‘scalloped’ portions helmet were hand sketched as well. I drew half of the pattern on a folded sheet of paper and then used a glass-top desk as a make-shift light table. I also learned that if you do it in pencil, you can transfer the pattern to foam by pressing the paper into it, sketch-side down.
My costume was built from plans provided by p00k1333 on theRPF. The template files can be found in this post. I suspect he’s much taller than I am, so it took a little trial an error, but these plans are beautiful.